Opel Corsa B 1993–2000 Service and Repair Manual: Rear shock absorbers - removal and refitting
1. Shock absorbers should be renewed in pairs, but they should only be removed from one side at a time. Proceed as described under the relevant sub-heading
Hatchback and Saloon
2. Inside the vehicle, remove the cap from the shock absorber top mounting. Grip the flats on the piston rod with pliers or a small spanner and unscrew the top mounting nut.
Remove the nut, washer and rubber buffer (see illustration).
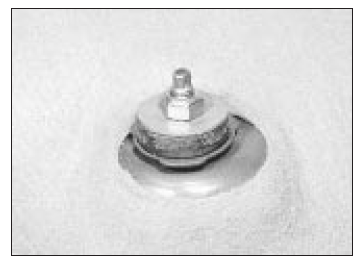
Rear shock absorber upper mounting
- Hatchback
3. Raise and support the rear of the vehicle.
4. On vehicles with the level control system disconnect the pressure line from the shock absorber by undoing the union nut.
5. Unbolt the shock absorber lower mounting (see illustration). Free the shock absorber from the bracket and remove it from the vehicle.
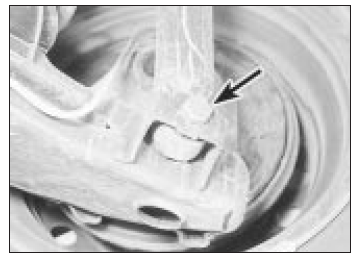
Rear shock absorber lower mounting
bolt (arrowed) - Hatchback
6. Commence refitting by introducing the shock absorber to the lower mounting bracket. Use a plastic or wooden mallet if need be.
7. Wedge the shock absorber so that the lower mounting hole is aligned. Fit the lower mounting bolt, tapping it gently through the shock absorber eye, and tighten it to the specified torque.
8. Partly lower the vehicle, guiding the top of the shock absorber into position. Make sure that the washer and rubber buffer for the underside of the top mounting are in position.
9. Lower the vehicle to the ground. Fit the top mounting rubber buffer and washer. Tighten the mounting nut or nuts to achieve an exposed piston rod length as shown (see illustration). Refit the cap.
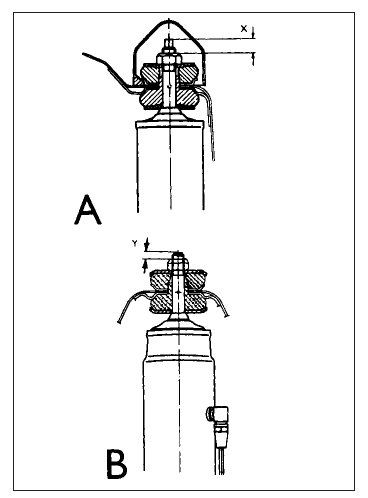
Rear shock absorber top mounting
setting
- Without level control
- With level control or two locknuts
X = 9 mm
Y = 6 mm
10. Repeat the operations on the other side of the vehicle. Where necessary, on completion, reconnect the pressure line unions and inflate the system to 0.8 bar.
Estate and Van
11. Raise and support the rear of the vehicle.
12. On vehicles with the level control system, disconnect the pressure line from the shock absorber by undoing the union nut.
13. Unload the shock absorber mounting by jacking up under the axle arm. Remove the lower mounting nut, washer and rubber buffer (see illustration). Lower the jack.
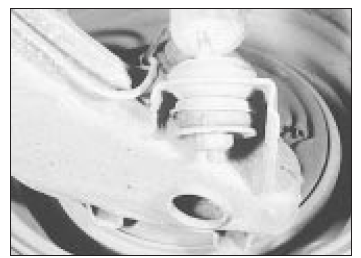
Rear shock absorber lower mounting
- Estate
14. Remove the top mounting bolt (see illustration) and extract the shock absorber from its mountings.
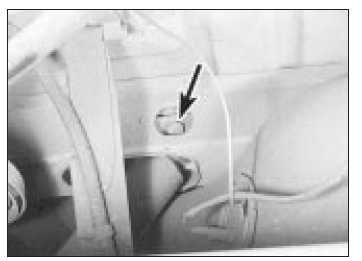
Rear shock absorber top mounting
bolt (arrowed) - Estate
15. Commence refitting by securing the top end of the shock absorber, but only tighten the bolt loosely at first.
16. Secure the bottom mounting, making sure that the rubber buffers and washers are in position, and tighten the cap nut to the specified torque.
17. Tighten the top mounting to the specified torque.
18. Repeat the operations on the other side of the vehicle, then lower it to the ground. Where necessary, on completion, reconnect the pressure line unions and inflate the system to 0.8 bar.
 Rear hub - removal and
refitting
Rear hub - removal and
refitting
Removal
Early (pre 1992) models
1. Remove the brake drum/disc.
2. Prise off the hub grease cap, remove the
split pin and undo the hub nut (see
illustration).
Rear hub nut split pin
3. Pull ...
 Rear anti-roll bar - removal
and refitting
Rear anti-roll bar - removal
and refitting
Main roll bar
Removal
1. Slacken the rear wheel bolts on one side
only. Raise and support the rear of the vehicle
and
remove the roadwheel.
2. Remove the mounting nut and bolt from
both ends of ...
See also:
Opel Corsa B 1993–2000 Service and Repair Manual. Unleaded petrol - general
information and usage
Note: The information given in this Chapter is
correct at the time of writing and applies only
to petrols currently available in the UK. If
updated information is thought to be required
check with ...
