Opel Corsa B 1993–2000 Service and Repair Manual: Steering column - removal and refitting
Removal
1. Disconnect the battery earth lead.
2. Although not strictly necessary, access will be improved if the steering wheel is removed.
3. Remove the upper and lower switch shrouds. These are secured by eight screws with the fixed steering wheel, or five screws with the adjustable wheel (see illustrations).
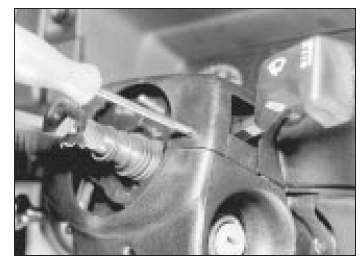
Removing an upper shroud securing
screw

Removing a lower shroud securing
screw adjustable wheel
4. Remove the steering lock cylinder.
5. Disconnect the ignition switch multi-plug.
6. Remove the multi-function switches by depressing their retaining clips. With the adjustable wheel it may be necessary to undo the switch housing screws and draw the housing away from the dashboard to provide sufficient clearance.
7. Make sure that the steering is in the straight-ahead position, then remove the flexible coupling clamp bolt from the base of the column. Unbolt the column support from the bulkhead and recover the washer.
8. Remove the column upper mounting bracket nut and bolt. The bolt is of the shear-head type: drill it and extract it with a proprietary stud extractor, or it may be possible to unscrew the bolt by driving its head round with a chisel or punch. The nut is a self-locking type and should be renewed.
9. Withdraw the column slightly to free it from the flexible coupling, then remove it from the vehicle. Avoid knocking or dropping it as this could damage the collapsible section.
10. If a new column assembly is to be fitted, a large plastic washer will be found at the base of the column tube. This is to centre the shaft in the tube and should be removed when fitting is complete.
Refitting
11. Commence refitting by making sure that the roadwheels are still in the straight-ahead position, and that the flexible coupling is positioned so that the column clamp bolt will be horizontal and on top.
12. Offer the column assembly to its mountings, inserting the base of the shaft into the coupling. Insert the mounting nuts and bolts, but only tighten them finger tight at this stage. Do not try to force the column into position or damage may result.
13. Tighten the column bulkhead support bolt to the specified torque. Make sure the washer is in place.
14. Tighten the upper mounting bracket fastenings: the shear-head bolt should be tightened until its head breaks off. The new self-locking nut should be tightened to the specified torque.
15. Pull the shaft upwards as far as it will go and tighten the flexible coupling clamp bolt to the specified torque.
16. Prise out the plastic washer from the base of the column tube. It can stay on the shaft.
17. Reconnect the ignition switch and refit the multi-function switches.
18. Refit the remaining components in the reverse order to removal.
Steering column - overhaul
The steering column incorporates a telescopic safety feature. In the event of a front end crash, the shaft housing collapses and prevents the steering wheel injuring the driver. Before refitting the steering column examine the column and mountings for signs of damage and deformation and check the steering shaft for signs of free play in the column bushes. If there are signs of damage or play, the column must be renewed.
Overhaul of the column is possible but this is a fiddly task and should be entrusted to a Vauxhall/Opel dealer. Consult your Vauxhall/Opel dealer for further information.
Steering column flexible coupling - removal and refitting
Removal
1. Position the steering in the straight-ahead position 2 Slacken the steering rack mountings on the bulkhead.
3. Remove both clamp bolts from the coupling.
4. Push the coupling upwards, remove it from the pinion shaft, tilt it and withdraw it from the column shaft.
Refitting
5. Before refitting, make sure that the roadwheels are still in the straight-ahead position and that the steering wheel spokes are centred and pointing downwards.
6. Fit the coupling in such a position that the column clamp bolt will be horizontal and on top.
7. Push downwards on the coupling and tighten the pinion side clamp bolt to the specified torque.
8. Tighten the steering gear mountings to the specified torque.
9. Pull the steering shaft upwards as far as it will go and tighten the clamp bolt to the specified torque.
10. Make sure that the roadwheels and the steering wheel are still in the straight-ahead position.
 Steering wheel - removal and
refitting
Steering wheel - removal and
refitting
Removal
1. Disconnect the battery earth lead.
2. Prise off the central cap from the steering
wheel. Disconnect the horn contact wires and
remove the cap (see illustration).
Removing the steer ...
 Steering lock cylinder and
ignition switch wiring block
- removal and refitting
Steering lock cylinder and
ignition switch wiring block
- removal and refitting
1. To renew either the ignition switch or the
steering lock cylinder, first remove the lower
half of the steering column shroud by undoing
and removing the securing screws.
Disconnect the batter ...
See also:
Opel Corsa Owners Manual. Interruption of power supply, Manual transmission
Interruption of power supply
In the event of an interruption of
power supply, the selector lever
cannot be moved out of the P
position.
If the battery is discharged, start the
v ...
