Opel Corsa B 1993–2000 Service and Repair Manual: Crankshaft rear oil seal - removal and refitting
Removal
1. Remove the engine from the car, and then remove the sump and flywheel.
2. Slacken the rear main bearing cap bolts slightly and withdraw the oil seal from its location.
Refitting
3. Lubricate the lips of a new oil seal and carefully ease it over the crankshaft boss and into position. Make sure that the seal is fully entered into its location so that its outer face is flush with the edge of the bearing cap and cylinder block.
4. Apply jointing compound to the contact edges of the main bearing cap and then tighten the retaining bolts to the specified torque.
5. Refit the sump and flywheel, as described earlier, and then refit the engine to the car.
Crankshaft and main bearings - removal and refitting
Removal
1. With the engine removed from the car, and all the components removed from it, as described in earlier Sections, the crankshaft can be removed as follows.
2. Invert the engine. The three main bearing caps are all different so note their locations.
3. Undo the retaining bolts and remove the bearing caps.
4. Lift out the crankshaft and remove the rear oil seal from the crankshaft boss.
5. Remove the main bearing shells from the crankcase and bearing caps and identify them for location.
Refitting
6. Commence reassembly as follows.
7. Ensure that the crankcase and crankshaft are thoroughly clean and that all oilways are clear. If possible blow the drillings out with compressed air, and then inject clean engine oil through them to ensure that they are clear.
8. Avoid using old bearing shells; wipe the shell seats in the crankcase clean and then fit the upper halves of the main bearing shells into their seats.
9. Note that there is a tab on the back of each bearing which engages with a groove in the shell seating (in both crankcase and bearing cap) (see illustration).
Bearing shell tab engages with groove (arrowed)
10. Wipe away all traces of protective grease on the new shells.
11. The central bearing shell also takes up the crankshaft endfloat. Note that the half-shells fitted to the cylinder block all have oil duct holes, while only the centre main bearing cap half-shells has an oil duct hole.
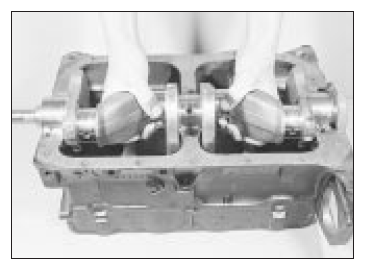
12. When the shells are fully located in the crankcase and bearing caps, lubricate them with clean engine oil (see illustration).
Lubricate the bearing shells
13. Carefully install the crankshaft into position in the crankcase (see illustration).
Fitting the crankshaft
14. Lubricate the crankshaft main bearing journals and then refit the centre main bearing cap (see illustration). Tighten the retaining bolts to the specified torque wrench setting.
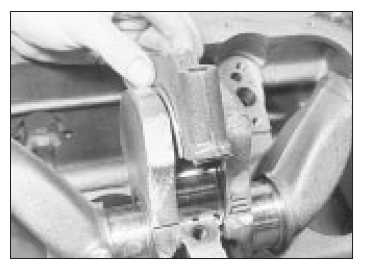
Fitting the centre main bearing cap
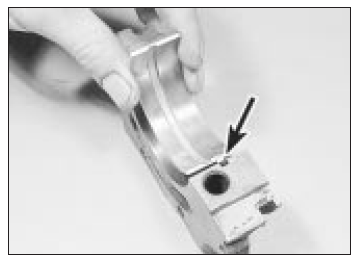
15. Locate the new oil seal onto the rear end of the crankshaft, and apply jointing compound to the block mating flange. Also fill the grooves on both sides of the rear main bearing cap with sealant (see illustrations).
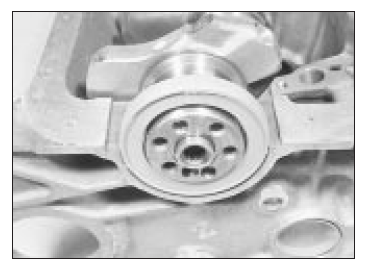
Crankshaft rear oil seal
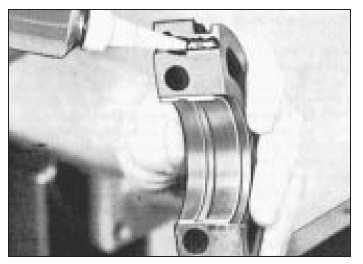
Fill the rear main bearing cap grooves with sealant
16. Fit the rear main bearing cap and tighten the retaining bolts to the specified torque (see illustration).
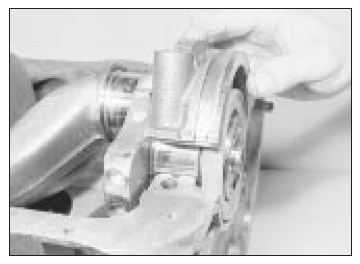
Fitting the rear main bearing cap
17. Fit the front main bearing cap, but before fitting the retaining bolts smear them with jointing compound and then tighten to the specified torque wrench setting. Check that the bearing cap is exactly flush with the end face of the crankcase as it is tightened.
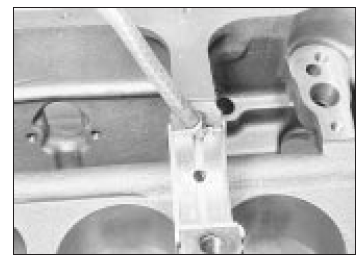
18. Now rotate the crankshaft and check that it turns freely, and shows no signs of binding or tight spots. Check that the crankshaft endfloat is within the limits specified using a feeler blade as shown (see illustration). No provision is made for adjusting crankshaft endfloat; if it is outside the specified limits, the most likely reasons are wear or incorrect regrinding (assuming that the correct shells have been fitted).
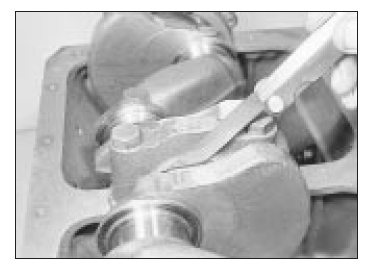
Checking the crankshaft endfloat
 Camshaft and tappets -
removal and refitting
Camshaft and tappets -
removal and refitting
Removal
1. Remove the engine from the car, and then remove the sump and timing gear
components.
2. If the cylinder head is still in place, slacken
the rocker arm nuts, move the rocker arms to
on ...
 Engine components -
examination and renovation
Engine components -
examination and renovation
Crankshaft
1. Examine the crankpin and main journal
surfaces for signs of scoring or scratches, and
check the ovality and taper of the crankpins
and main journals. If the bearing surface
dimensio ...
See also:
Opel Corsa B 1993–2000 Service and Repair Manual. Check control system - general
information
1. Fitted to some higher specifications
models, the check control system monitors
important fluid levels, brake pad wear and
bulb failure. A bank of six or seven warning
lights to the left of the ...
