Opel Corsa B 1993–2000 Service and Repair Manual: Crankshaft and main bearings - removal and refitting
Removal
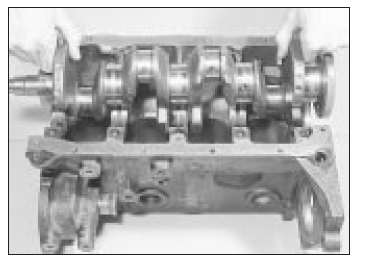
1. With the engine removed from the car, and all the components removed from it, as described in earlier Sections, the crankshaft can be removed as follows.
2. Invert the engine so that it is standing on the top surface of the cylinder block.
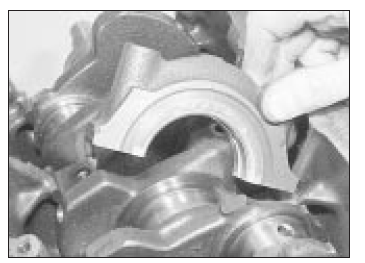
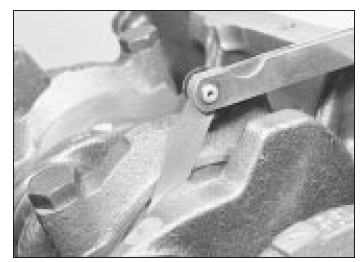
3. The main bearing caps are numbered 1 to 4 from the toothed belt end of the engine. The rear cap is not marked. To ensure that the caps are fitted the correct way round, note that the numbers are read from the water pump side when the crankcase is inverted (see illustration).
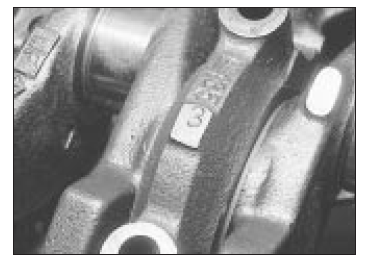
Identification number on No 3 main
bearing cap
4. Unscrew and remove the main bearing cap bolts and tap off the caps. If the bearing shells are to be used again, keep them with their respective caps. The original shells are colour-coded and if used again must be returned to their original locations.
5. Note that the centre bearing shell incorporates thrust flanges to control crankshaft endfloat.
6. Lift the crankshaft from the crankcase.
Extract the upper half shells and again identify their position in the crankcase if they are to be used again.
7. The rubber plug location adjacent to the bellhousing flange on the crankcase covers the aperture for installation of a TDC sensor.
This sensor when connected to a suitable monitoring unit, indicates TDC from the position of the contact pins set in the crankshaft counterbalance weight (see illustration).
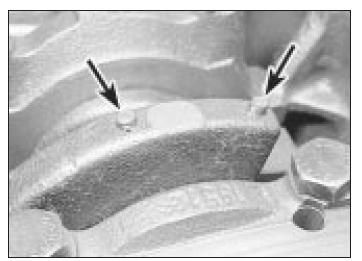
TDC sensor contact pins (arrowed) in
crankshaft web
Refitting
8. Ensure that the crankcase and crankshaft are thoroughly clean and that all oilways are clear. If possible blow the drillings out with compressed air, and then inject clean engine oil through them to ensure that they are clear.
9. Wipe the shell seats in the crankcase and bearing caps clean and then fit the upper halves of the main bearing shells into their seats.
10. Note that there is a tag on the back of each bearing which engages with a groove in the shell seating in both crankcase and bearing cap (see illustration).
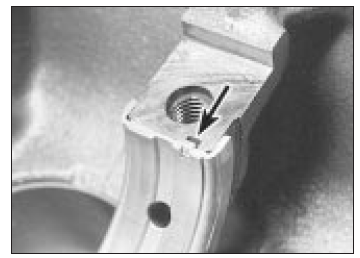
Main bearing shell correctly fitted,
with tag and groove (arrowed) engaged
11. Wipe away all traces of protective grease on the new shells.
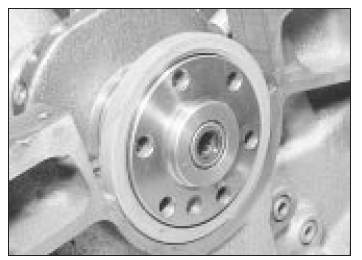
12. The central bearing shell also takes up the crankshaft endfloat (see illustration). Note that the half shells fitted to the cylinder block all have oil duct holes, while only the centre main bearing cap half shell has an oil duct hole.

Centre main bearing shell, showing thrust flanges
13. When the shells are fully located in the crankcase and bearing caps, lubricate them with clean engine oil.
14. Fill the lips of a new crankshaft oil seal with grease and fit it to the end of the crankshaft (see illustration).
Crankshaft rear oil seal
15. Carefully install the crankshaft into position in the crankcase (see illustration).
Fitting the crankshaft
16. Lubricate the crankshaft main bearing journals and then refit the centre and intermediate main bearing caps. Tighten the retaining bolts to the specified torque wrench setting (see illustrations).
Fitting a main bearing cap
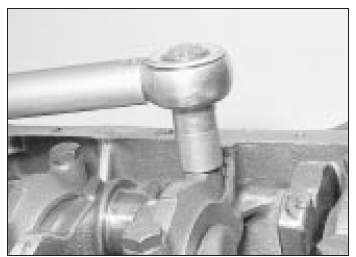
Tightening a main bearing cap bolt
17. Coat the inner surfaces of the rear main bearing cap with sealant to GM spec 15 04 200/8 983 368. (This sealant is available in 200 ml tubes from GM parts departments.) Fill the side grooves of the bearing cap with RTV jointing compound. After fitting the bearing cap and tightening its securing bolts, inject further RTV jointing compound into the side grooves until it is certain that they are full (see illustration).
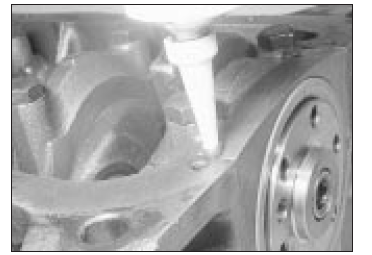
Inject jointing compound into the cap side grooves
18. Fit the front main bearing cap, but before fitting the retaining bolts, smear them with jointing compound, and then tighten to the specified torque wrench setting. Check that the bearing cap is exactly flush with the end face of the crankcase as it is tightened.
19. Now rotate the crankshaft and check that it turns freely, and shows no signs of binding or tight spots. Check that the crankshaft endfloat is within the limits specified, using a dial gauge or with feeler blades inserted between the flange of the centre bearing shell and the machined surface of the crankshaft (see illustration). Before measuring, make sure that the crankshaft has been forced fully towards one end of the crankcase to give the widest gap at the measuring location.
Incorrect endfloat will most likely be due to wear or to incorrect regrinding (assuming that the correct shells have been fitted).
Checking crankshaft endfloat
 Crankshaft front oil seal -
removal and refitting
Crankshaft front oil seal -
removal and refitting
Removal
1. Remove the camshaft toothed belt. On 1.6 (16SH),
1.8 and
2.0 litre models, note that it will also be
necessary to undo the crankshaft sprocket
centre bolt and
remove the sprocket and ...
 Engine components -
examination and renovation
Engine components -
examination and renovation
Camshaft
1. With the camshaft removed, examine the
bearings for signs of obvious wear and pitting.
If evident, a new camshaft housing will
probably be required.
2. The camshaft itself should sh ...
See also:
Opel Corsa B 1993–2000 Service and Repair Manual. Starter motor - removal and overhaul
refitting
Removal
1. Disconnect the battery earth lead.
1.2 litre models
2. Disconnect the battery positive leads;
separate the starter motor lead from the other.
Also disconnect the positive lead from t ...
