Opel Corsa B 1993–2000 Service and Repair Manual: Engine lubrication and crankcase ventilation systems - general description
1. Oil pressure for all moving components is provided by a gear type oil pump which is driven from the front end of the crankshaft.
The crankshaft has flats for this purpose.
2. The pump draws oil from the sump through a pick-up pipe and strainer and pumps it through the oil filter and oil galleries to the engine friction surfaces.
3. A pressure regulator valve is screwed into the body of the oil pump. A relief valve, located in the oil filter mounting base, opens should the filter block due to clogging caused by neglected servicing. An oil pressure switch is screwed into the pump casing.
4. The cylinder bores are lubricated by oil splash from the sump.
5. The hydraulic valve lifters are pressurised with oil to maintain optimum valve clearance at all times.
6. The crankcase ventilation system is designed to draw oil fumes and blow-by gas (combustion gas which has passed the piston rings) from the crankcase into the air cleaner, whence they are drawn into the engine and burnt during the normal combustion cycle.
7. On larger engines, one of the crankcase ventilation hoses is attached to the camshaft cover. Inside the cover is a filter which should be cleaned in paraffin periodically (see illustrations).
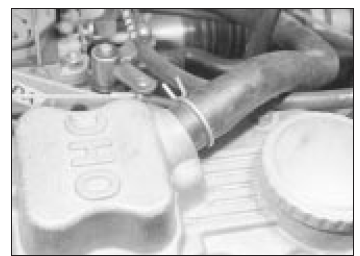
Crankcase ventilation hose attached to camshaft cover (1 .8 litre engine
shown)
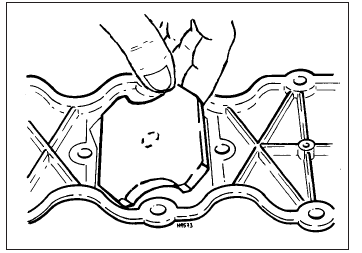
Camshaft housing filter
8. On smaller engines, the ventilation system incorporates an oil separator bolted to the block. Although it is not a specified maintenance task, the separator can be removed for cleaning (see illustration).
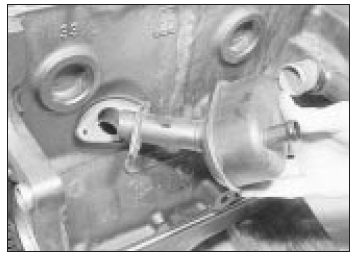
Crankcase ventilation system oil
separator - 1.3 litre engine
9. On all engines, the breather hoses should be cleaned out periodically and renewed if necessary. Investigate the cause of any build-up of white sludge - sometimes this indicates a cooling system fault or a blown head gasket, although it may simply mean that the engine is not reaching operating temperature (eg short runs in winter).
10. The lubrication system of some larger engines incorporates an oil cooler. Oil leaves and returns via an adapter mounted between the oil filter and its housing (see illustrations).
The adapter contains a thermostatic valve which prevents the oil from circulating in the cooling circuit until it has warmed up. The oil cooler itself is mounted in front of the radiator.
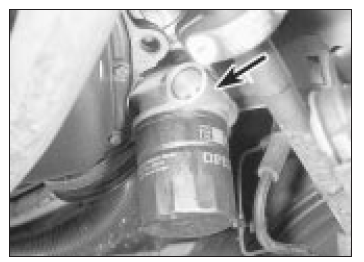
Oil cooler adapter (arrowed) above oil filter
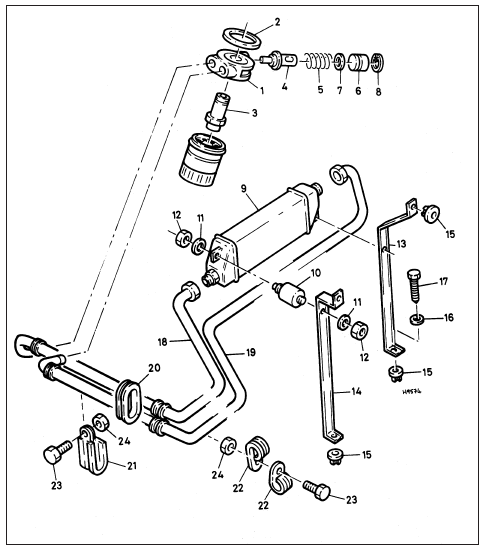
Oil cooler and associated components
- Adapter
- Sealing ring
- Hollow screw
- Thermostatic valve
- Spring
- Plug
- Seal
- Circlip
- Oil cooler
- Mounting rubber
- Washer
- Nut
- Bracket
- Bracket
- Nuts
- Washer
- Screw
- Flow pipe
- Return pipe
- Grommet
- Clamp
- Clamps
- Screws
- Nuts
11. The oil cooler pipes and hoses should be inspected regularly for signs of deterioration or leakage. The oil cooler fins will benefit from an occasional cleaning with solvent, followed if possible by blowing through the fins with compressed air.
12. At time of engine overhaul, consideration should be given to renewing the oil cooler, especially if major mechanical failure has occurred. If the old cooler is to be re-used it should be flushed with several changes of clean oil in an attempt to remove metal particles and other contaminants.
13. Access to the oil cooler is gained by removing the radiator or the front trim panel.
 Engine components -
examination and renovation
Engine components -
examination and renovation
Camshaft
1. With the camshaft removed, examine the
bearings for signs of obvious wear and pitting.
If evident, a new camshaft housing will
probably be required.
2. The camshaft itself should sh ...
 Engine - removal and refitting
Removal
1. The OHC engines may be removed either
with or without the manual gearbox. To
remove the engine alone, making
allowances for differences in the attachment
of components such as the carb ...
See also:
Opel Corsa Owners Manual. Interruption of power supply, Manual transmission
Interruption of power supply
In the event of an interruption of
power supply, the selector lever
cannot be moved out of the P
position.
If the battery is discharged, start the
v ...
