Opel Corsa B 1993–2000 Service and Repair Manual: Spark plug renewal
1. The correct functioning of the spark plugs is vital for the correct running and efficiency of the engine. It is essential that the plugs fitted are appropriate for the engine, the suitable type being specified at the end of this Chapter. If the correct type of plug is used and the engine is in good condition, the spark plugs should not need attention between scheduled renewal intervals, except for adjustment of their gaps. Spark plug cleaning is rarely necessary, and should not be attempted unless specialised equipment is available, as damage can easily be caused to the firing ends.
2. To remove the plugs, first open the bonnet.
On 1.2 litre models remove the air cleaner. On 2.0 litre 16-valve engines undo the retaining screws and remove the spark plug lead cover from the engine.
3. Mark the HT leads 1 to 4, to correspond to the cylinder the lead serves (No 1 cylinder is nearest the timing belt end of the engine). Pull the HT leads from the plugs by gripping the end connectors, not the leads, otherwise the lead connections may be fractured.
4. It is advisable to remove any dirt from the spark plug recesses using a clean brush, vacuum cleaner or compressed air, before removing the plugs, to prevent the dirt dropping into the cylinders.
5. Unscrew the plugs using a spark plug spanner, a suitable box spanner, or a deep socket and extension bar (see illustration).
Keep the socket in alignment with the spark plugs, otherwise if it is forcibly moved to either side, the porcelain top of the spark plug may be broken off. As each plug is removed, examine it as follows.
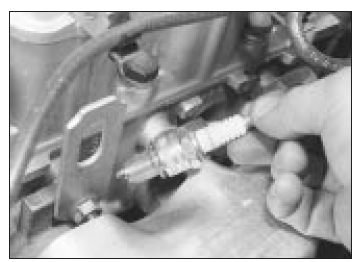
Removing a spark plug - 1.6 litre
engine shown
6. Examination of the spark plugs will give a good indication of the condition of the engine.
If the insulator nose of the spark plug is clean and white, with no deposits, this is indicative of a weak mixture or too hot a plug (a hot plug transfers heat away from the electrode slowly, while a cold plug transfers heat away quickly).
7. If the tip and insulator nose are covered with hard black-looking deposits, then this is indicative that the idle mixture is too rich.
Should the plug be black and oily, then it is likely that the engine is fairly worn, as well as the mixture being too rich.
8. If the insulator nose is covered with lighttan to greyish-brown deposits, then the mixture is correct and it is likely that the engine is in good condition.
9. The spark plug gap is of considerable importance as, if it is too large or too small, the size of the spark and its efficiency will be seriously impaired. For the best results, the spark plug gap should be set in accordance with the Specifications at the end of this Chapter.
10. To set the spark plug gap, measure the gap between the electrodes with a feeler blade, and then bend open, or close, the outer plug electrode until the correct gap is achieved (see illustrations). The centre electrode should never be bent, as this may crack the insulation and cause plug failure, if nothing worse.
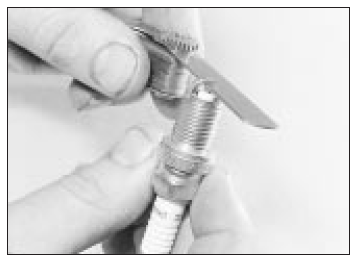
Measuring a spark plug electrode
gap using a feeler blade
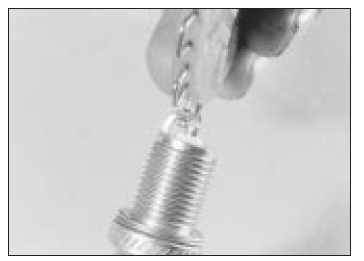
Measuring a spark plug electrode
gap using a wire gauge
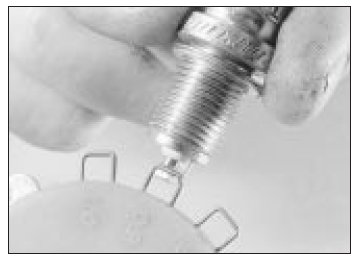
11. Special spark plug electrode gap adjusting tools are available from most motor accessory shops (see illustration).
Adjusting a spark plug electrode gap
using a special tool
12. Before fitting the new spark plugs, check that the threaded connector sleeves on the top of the plug are tight, and that the plug exterior surfaces and threads are clean.
13. Screw in the spark plugs by hand where possible, then tighten them to the specified torque. Take extra care to enter the plug threads correctly, as the cylinder head is of light alloy construction.
|
It is very often difficult to insert spark plugs into their holes without crossthreading them. To avoid this, fit a short length of 5/16-inch internal diameter hose over the end of the spark plug. The flexible hose acts as a universal joint to help align the plug with the plug hole. Should the plug begin to cross-thread, the hose will slip on the spark plug, preventing thread damage to the aluminium cylinder head. |

14. Reconnect the HT leads in their correct order. On 1.2 litre models refit the air cleaner and on 2.0 litre 16-valve models, refit the spark plug lead cover.
 Engine oil and filter renewal
1. Frequent oil and filter changes are the most
important preventative maintenance
procedures which can be undertaken by the
DIY owner. As engine oil ages, it becomes
diluted and contaminated, whi ...
 Hose and fluid leak check
1. Visually inspect the engine joint faces,
gaskets and seals for any signs of water or oil
leaks. Pay particular attention to the areas
around the camshaft cover, cylinder head, oil
filter and su ...
See also:
Opel Corsa Owners Manual. Airbag system
The airbag system consists of
a number of individual systems.
When triggered the airbags inflate
within milliseconds. They also deflate
so quickly that it is often unnoticeable
during the collisi ...
