Opel Corsa B 1993–2000 Service and Repair Manual: Boot lid and torsion rods - removal and refitting
Removal
1. Open the boot.
2. Draw alignment marks between the boot lid and the hinge brackets on both sides of the vehicle.
3. On models with central locking, disconnect the lock motor connector. The connector is located in the left-hand corner of the boot.
4. With the aid of an assistant, support the boot lid and undo the hinge bolts (see illustration). Remove the boot lid.
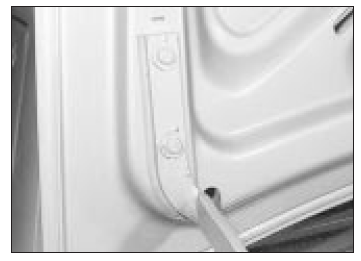
Boot lid hinge bolts
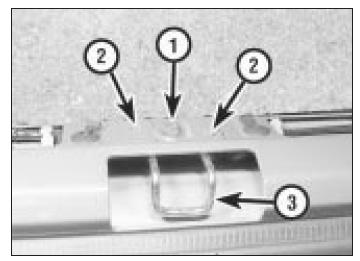
5. The torsion rods are held in place by their own spring tension. They can be removed by carefully unhooking them first from the central housing bracket, then from the hinge brackets (see illustrations).
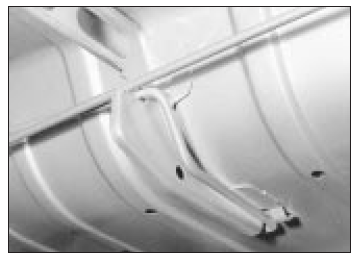
Torsion rod central housing bracket
Hinge bracket assembly
- Torsion rod
- Bump stop
Refitting
6. Refitting is the reverse of the removal procedure. Observe the alignment marks if refitting the original lid. If fitting a new lid, just nip up the hinge bolts at first until satisfied with the fit, then carry out final tightening.
Note: On early models it may be found that despite correct alignment the boot lid contacts the rear screen at the centre of its front edge. This can be remedied by fitting rubber bump stops to limit the height of travel of the lid.
Boot lid lock components - removal and refitting
Boot lid lock assembly - removal and refitting
1. Mark a line around the outer edge of the lock assembly on the boot lid.
2. Remove the securing screws (see illustration) and lift away the lock.
Boot lid lock securing screws
3. Refitting is the reverse of the removal procedure. Use the line marked before removal as a guide to positioning the lock.
4. Check the operation of the lock by opening and closing the boot lid several times. If necessary adjust the position of the lock or catch.
Boot lock catch - removal, refitting and adjustment
5. Remove the protective trim panel from the boot lip.
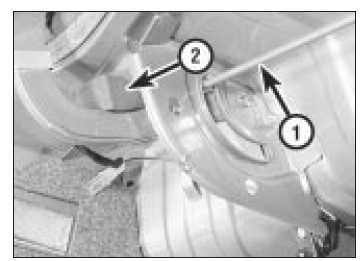
6. Remove the retaining bolt. Disengage the catch spigots and remove it (see illustration).
Boot lock catch retaining bolt (1),
spigots (2) and catch (3)
7. Refitting is the reverse of the removal procedure.
8. The height of the catch may be adjusted by slackening the retaining bolt and moving the catch up or down to provide satisfactory closing and a snug fit with the edge seal.
Boot lid handle - removal and refitting
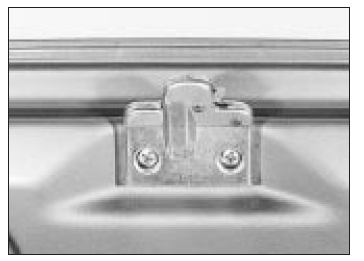
9. Open the boot and remove the two nuts, accessible from inside, which secure the handle (see illustration).
Boot lid handle retaining nut
10. Refitting is the reverse of the removal procedure.
Windscreen and other fixed glass - removal and refitting
1. With the exception of the small fixed windows in the rear passenger door, whose removal is covered, the fixed glass is glued in position with adhesive.
2. Special tools, equipment and expertise are required for successful removal and refitting of glass fixed by this method. The work must therefore be left to a GM dealer, a windscreen specialist or other competent professional.
3. The same remarks apply if sealing of the windscreen or other glass surround is necessary.
 Tailgate - removal and refitting
Removal
1. Open the tailgate and have an assistant
support it.
2. Disconnect the rear screen washer tube
and any wiring that enters the tailgate - this
will vary according to model and equipment. ...
 Rear quarterlight (opening
type) - removal and refitting
Rear quarterlight (opening
type) - removal and refitting
Removal
1. Unclip the interior trim panels from around
the quarterlight.
2. Remove the three screws which secure the
catch to the body.
3. Unscrew the two special nuts which hold
the hinges to t ...
See also:
Opel Corsa Owners Manual. Engine exhaust, Diesel particle filter
Engine exhaust
Danger:
Engine exhaust gases contain
poisonous carbon monoxide,
which is colourless and odourless
and could be fatal if inhaled.
If exhaust gases enter the interior ...
