Opel Corsa B 1993–2000 Service and Repair Manual: Cylinder head - removal and refitting
Removal
1. Make sure that the engine is cold before commencing operations to avoid any chance of the head distorting.
2. Disconnect the battery negative terminal
3. Drain the cooling system, and remove the air cleaner.
4. From behind the engine, undo the two bolts securing the exhaust front pipe to the manifold. Remove the bolts and tension springs; then separate the pipe joint from the manifold.
5. Slacken the retaining clip and disconnect the radiator top hose from the thermostat housing in the water pump.
6. Slacken the alternator mounting and adjustment arm bolts, move the alternator towards the engine and slip the drivebelt off the pulleys.
7. Slacken the retaining clips and disconnect the heater hose and radiator bottom hose from the water pump.
8. Disconnect the other heater hose at the cylinder head outlet after slackening the retaining clip.
9. Undo the union nut and disconnect the brake servo vacuum hose from the inlet manifold.
10. Note the location of the plug leads to aid refitting and pull them off the spark plugs.
Disconnect the HT lead at the coil, undo the distributor cap retaining screws and remove the cap and leads.
11. Disconnect the choke and accelerator cables from the carburettor. Detach the distributor vacuum advance pipe.
12. Disconnect the fuel hose from the carburettor and plug its end after removal.
13. Disconnect the engine breather hoses from the rocker cover.
14. Undo the three socket-headed screws securing the inlet manifold to the cylinder head. Note the spark plug lead support brackets fitted to the two end retaining bolts.
15. Lift the inlet manifold complete with carburettor from the cylinder head and recover the gasket.
16. Undo the four bolts and shaped spreader washers and lift off the rocker cover.
17. Slacken the rocker arm retaining nuts, move the rocker arms to one side and lift out the pushrods (see illustration). Keep the pushrods in order after removal.
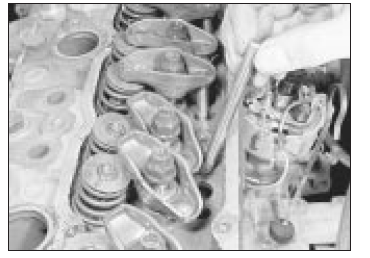
Removing the pushrods
18. Undo the cylinder head retaining bolts, half a turn at a time in the reverse sequence to that shown in illustration. Unscrew the bolts fully and remove them. Obtain new bolts for use when refitting.
19. Lift the cylinder head from the block. If it is stuck, tap it free with a soft-faced mallet. Do not insert a lever into the gasket joint - you may damage the mating surfaces.
20. With the cylinder head removed, recover the gasket.
21. If the cylinder head has been removed for decarbonising or for attention to the valves or springs.
Refitting
22. Before refitting the cylinder head, ensure that the cylinder block and head mating faces are spotlessly clean and dry with all traces of old gasket removed. Use a scraper and wire brush to do this, but take care to cover the water passages and other openings with masking tape or rag to prevent dirt and carbon falling in. Remove all traces of oil and water from the bolt holes, otherwise hydraulic pressure created by the bolts being screwed in could crack the block or give inaccurate torque settings. Ensure that the bolt threads are clean and dry.
23. When all is clean, screw two guide studs into the cylinder block. These can be made from the two old cylinder head bolts by cutting off their heads and sawing a screwdriver slot in their ends.
24. Locate a new gasket in position on the block as shown (see illustration). Do not use any jointing compound on the gasket.
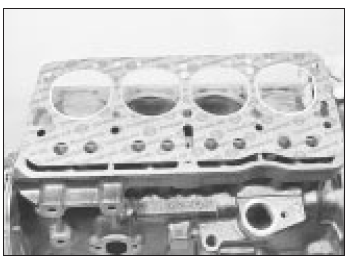
Fitting a cylinder head gasket
25. Lower the cylinder head carefully into position. Screw in new bolts finger tight, remove the guide pins and screw in the two remaining bolts.
26. Tighten the cylinder head bolts in the order shown (see illustration) to the first stage specified torque. Now tighten the bolts through three further stages as given in the Specifications. No further retightening will be required.
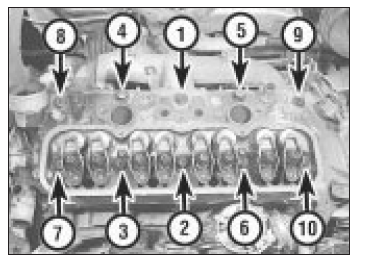
Cylinder head bolt tightening sequence
27. Refit the pushrods, making quite sure that each one is located in its tappet.
28. Reposition the rocker arms over the ends of the pushrods and then adjust the valve clearances.
29. Place a new gasket in position and refit the inlet manifold and carburettor (see illustration).
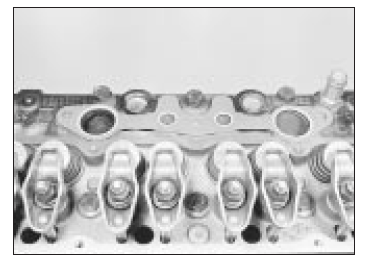
Inlet manifold gasket in position
30. Refit the rocker cover, using a new gasket, and secure with the four bolts and spreader washers.
31. Refit the heater hoses and radiator hoses to the outlets on the water pump and cylinder head.
32. Refit the fuel hose to the carburettor, the vacuum advance pipe to the distributor and the breather hoses to the rocker cover.
33. Refit and adjust the accelerator and choke cables.
34. Refit the brake servo vacuum hose to the inlet manifold.
35. Refit the distributor cap and reconnect the plug leads and coil lead.
36. Slip the drivebelt over the pulleys and adjust its tension.
37. Reconnect the exhaust front pipe to the manifold and tighten the bolts to compress the tension springs.
38. Refill the cooling system, refit the air cleaner and connect the battery negative terminal.
 Valve clearances - adjustment
1. This adjustment should be carried out with
the engine at its normal operating
temperature. If it is being done after overhaul
when the engine is cold, repeat the
adjustment after the car has be ...
 Cylinder head - overhaul
1. Unscrew the rocker arm retaining
/adjustment nuts and withdraw the rocker
arms from the studs. Keep them in order as
they are removed.
2. To remove the valves, the springs will have
to be comp ...
See also:
Opel Corsa B 1993–2000 Service and Repair Manual. Crankshaft front oil seal -
renewal
1. Remove the crankshaft sprocket as
described in the procedure for oil pump
removal. There is no need to remove the camshaft
sprockets or belt backplate. Recover the
spacer from behind the sprock ...
