Opel Corsa B 1993–2000 Service and Repair Manual: Instrument panel - removal and refitting
Removal
1. Disconnect the battery earth lead.
2. Remove the horn push from the steering wheel.
3. Remove the steering column switch upper shroud, which is secured by four screws.
Unlock the steering and turn the wheel as necessary to gain access to two of the screws.
4. Remove the four screws which secure the instrument panel surround and bottom trim strip. There are two screws at the top and one in each bottom corner; they may be covered by cosmetic caps (see illustration).
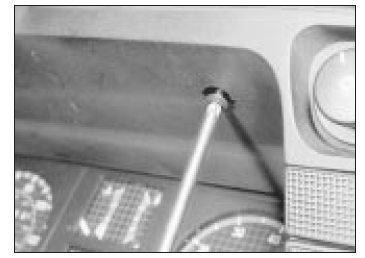
Removing an instrument panel
surround screw
5. Withdraw the instrument panel surround, disconnecting the wires from the various switches (see illustration).
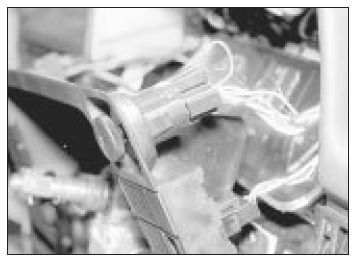
Withdrawing the instrument panel
surround
6. Except on the LCD instrument panel, disconnect the speedometer cable by depressing its retaining clip and pulling it away from the speedometer.
7. Remove the single securing screw and withdraw the instrument panel (see illustrations). Disconnect the electrical leads if the panel is to be removed completely, making notes if there is any possibility of confusion later. When an econometer is fitted, disconnect the vacuum hose.

Removing the instrument panel
securing screw
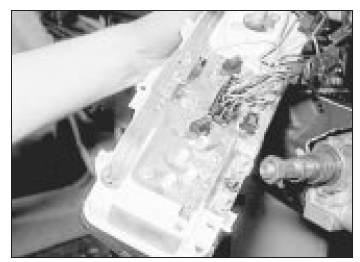
Withdrawing the instrument panel
Refitting
8. Refit in the reverse order of removal. On models with an LCD display, prior to refitting, ensure that the speedometer frequency code switch is set to the correct position (see illustration). On models with 175/70 R 13 or 185/60 R 14 tyres set the switch to position 1, and on all other models set the switch to position 2.

LCD instrument frequency code switch
shown in position 1
Instrument panel - dismantling and reassembly
1. No attempt must be made to dismantle the LCD type instrument panel: its bulbs can be renewed, but that is all. Consult a GM dealer if an instrument fault is suspected: special test equipment is required for accurate diagnosis.
2. Individual instruments can be removed from the conventional instrument panel after removing the cover, which is secured by two screws at the top and three lugs at the bottom. The instruments are secured by screws or nuts (see illustration).
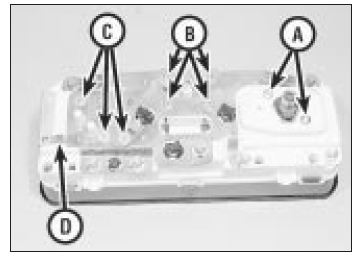
Instrument panel rear view (typical)
- Speedometer retaining screws
- Fuel/temperature gauge retaining nuts
- Tachometer retaining nuts
- Instrument voltage stabiliser
3. Illumination and warning lamp bulbs can be removed by turning the combined bulb and holder anti-clockwise and withdrawing it from the rear of the panel. There is no need to remove the instrument panel completely to do this - just withdraw it far enough to gain access to the printed circuit.
4. The printed circuit can be renewed if all the instruments etc are transferred from the old one.
 Clock - removal and refitting
Removal
1. Disconnect the battery earth lead.
2. Carefully pull the clock from its location.
Disconnect the supply and illumination leads
from the clock and remove it (see
illustration).
R ...
 Speedometer cable - removal
and refitting
Speedometer cable - removal
and refitting
Removal
1. A mechanical cable is not used with the
LCD instrument panel; the electrical sender
bolts onto the gearbox in the same position as
the conventional cable.
2. To renew a mechanical cabl ...
See also:
Opel Corsa B 1993–2000 Service and Repair Manual. Fuel pump - removal and
refitting
Note: Refer to the warning note
before proceeding.
Removal
1.4, 1.6 and later (1990 on) 2.0 litre 8-
valve models
1. The fuel pump is located inside the fuel
tank. Before removing the pump, det ...
