Opel Corsa Owners Manual: Glovebox, Cupholders, Underseat storage, Rear carrier system
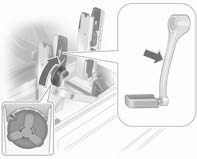
Glovebox
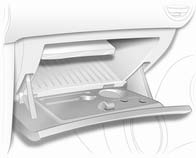
Glovebox
The glovebox features: ■ card holder in cheque card format.
■ pen holder.
■ pocket torch holder.
The glovebox should be closed whilst driving.
Cupholders
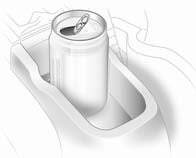
Cupholders
A cupholder is located in the front of the centre console.
In the 3-door Hatchback, a cupholder is also located at the side of the rear seat.
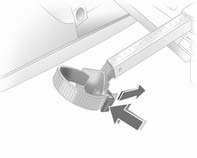
Underseat storage
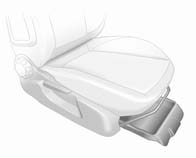
Underseat storage
Lift at recessed edge and pull out.
Maximum load: 1.5 kg. To close, push in and engage.
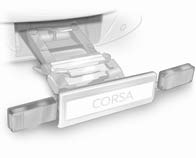
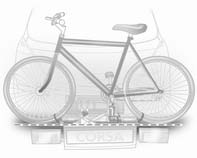
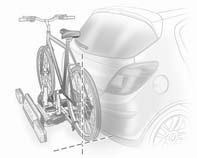
Rear carrier system
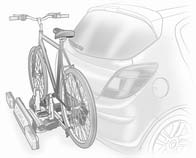
The rear carrier system (Flex-Fix system) allows bicycles to be attached to a pull-out carrier integrated into the vehicle floor.
The maximum load is 40 kg.
If not in use, the rear carrier system can be slid back into the vehicle floor.
A multifunction box is offered as an accessory for the rear carrier system.
The transportation of other objects is not permitted.
There must not be any objects on the bicycles that could become loose during transportation.
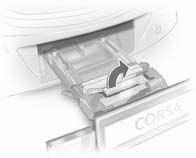
Extending
Open the tailgate.
Warning:
No people may remain in the
extension zone of the rear carrier
system, risk of injury.
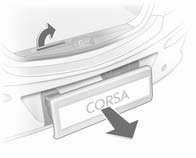
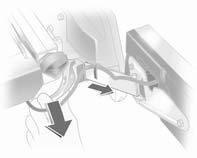
Pull release lever up. The system disengages and travels quickly out of the bumper.

Completely pull out the rear carrier system until you hear it engage.
Ensure that it is not possible to push in the rear carrier system without pulling the release lever again.
Warning:
It is only permissible to fit objects
to the rear carrier system if the
system has been correctly
engaged. If the rear carrier system
will not engage correctly, do not fit
objects to the system and slide the
system back. Seek the assistance
of a workshop.
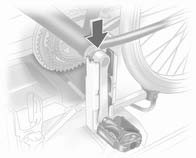
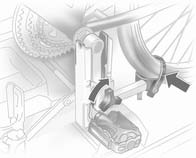
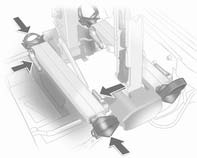
Install the tail lamps
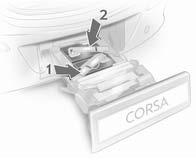
First remove the rear tail lamp (1), then the front tail lamp (2) from their recesses.
Open out the bulb holder on the back of the tail lamp completely.
Push the clamping lever down and push the bulb holder into the retainer until it hits the stop.
Perform this procedure for both tail lamps.
Check the cable and lamp position to make sure these are correctly installed and are securely located.

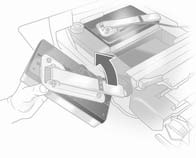
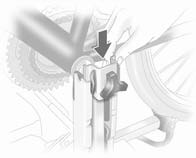
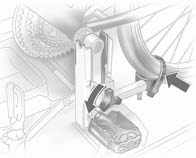
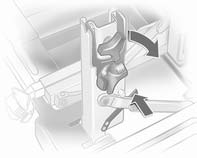
Lock the rear carrier system
Swivel the left clamping lever (1) back first, followed by the right clamping lever (2) until they stop. Both clamping levers must point backwards, otherwise safe functionality is not guaranteed.
Close the tailgate.
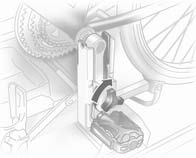
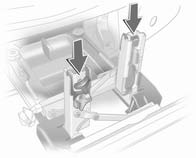
Unfold pedal crank recesses
Fold one or both pedal crank recesses upwards until the diagonal support engages.
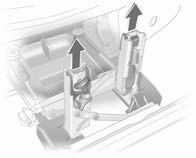
Remove the pedal crank mounts from the pedal crank recesses.
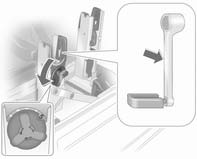
Adapting the rear carrier system
to a bicycle
With the rotary lever on the pedal crank recess, roughly adapt the adjustable pedal crank unit to the protrusion of the pedal crank.
If the bicycle has straight pedal cranks, unscrew the pedal crank unit completely (position 5).
If the bicycle has curved pedal cranks, screw in the pedal crank unit all the way (position 1).
Press the release lever and withdraw the wheel recesses.
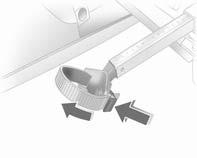
Push the release lever on the strap retainer and remove the strap retainer.
Prepare the bicycle for
attachment
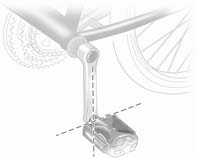
Rotate the left pedal (opposite the chain cog) vertically downwards. The pedal on the left pedal crank must be horizontal.
The front bicycle must have its front wheel facing left.
The rear bicycle must have its front wheel facing right.
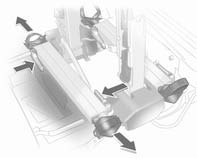
Attaching a bicycle to the rear
carrier system
Put on the bicycle. The pedal crank here must be placed in the pedal crank recess opening as shown in the illustration.
Insert pedal crank mount into outer rail of each pedal crank recess from above and slide downwards as far as it will go.
Attach the pedal crank by rotating the attachment screw on the pedal crank mount.
Place the wheel recesses such that the bicycle is more or less horizontal.
Here, the distance between the pedals and the tailgate should be at least 5 cm (2 inches).
Both bicycle tyres must be in the wheel recesses. In order to prevent damage, neither the pedal bearing housing on the bicycle nor the pedal crank is allowed to be touching the pedal crank recess.
Align the bicycle in the longitudinal direction of the vehicle: Slightly loosen the pedal mount.
Place the bicycle upright using the rotary lever on the pedal crank recess.
If the two bicycles obstruct one another, the relative positions of the bicycles can be adapted by adjusting the wheel recesses and the rotary lever on the pedal crank recess until the bicycles no longer touch one another. Make sure there is sufficient clearance from the vehicle.
Tighten the attachment screw for the pedal bearing mount to its maximum point.
Secure both bicycle wheels to wheel recesses using strap retainers.
Check the bicycle to make sure it is secure.
The settings for the wheel recesses and on the rotary lever on the pedal crank recess should be noted and saved for each bicycle. Correct presetting will facilitate refitting of the bicycle.
Removing a bicycle from the rear
carrier system
Undo strap retainers on both bicycle tyres.
Hold on to the bicycle, loosen the attachment screw for the pedal bearing mount, then lift the pedal bearing mount to remove it.
Retracting the rear carrier system
Push the pedal crank mounts into the pedal crank recess.
Insert the strap retainer and pull tightly downwards as far as possible.
Press release lever and slide in wheel recesses all the way as far as they will go.
Disengage the locking lever on the diagonal support and fold both pedal crank recesses down.
Warning:
Risk of pinching.
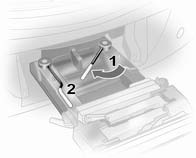
Swivel first the right clamping lever (1) forwards, followed by the left clamping lever (2), until they can be engaged in their respective recesses.
Push the clamping lever down and pull both bulb holders out of their recesses.

Fold in the bulb holders on the backs of the tail lamps.
First place the front tail lamp (1), then the rear tail lamp (2) in their recesses and push down as far as possible.
Push cables all the way into all guides in order to prevent damage.
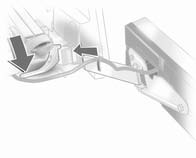
Open the tailgate.
Push the release lever up and push the system into the bumper until it engages.
Release lever must be returned to original position.
Warning:
If the system cannot be correctly
engaged, please seek the
assistance of a workshop.
 Storage
...
 Load compartment extension, Folding down rear backrests
Load compartment extension
The angle of the rear backrest, in
a single unit or split, can be locked in
a vertical rather than raked position,
for transporting bulky items.
Pull t ...
See also:
Opel Corsa Owners Manual. Lashing eyes, Warning triangle, First aid kit, Roof rack
Lashing eyes
The lashing eyes are designed to
secure items against slippage, e.g.
using lashing straps or luggage net.
Warning triangle
Warning triangle
Store wa ...
