Opel Corsa B 1993–2000 Service and Repair Manual: Handbrake adjustment
Rear drum brake models
1. Normal adjustment of the handbrake takes place automatically due to the self-adjusting mechanism of the rear brakes. To compensate for cable stretch, or after a new cable has been fitted or the adjustment has otherwise been disturbed, proceed as follows.
2. Chock the front wheels, release the handbrake and raise and support the rear of the vehicle so that the rear wheels are clear of the ground.
3. Tighten the nut on the handbrake cable yoke until the rear wheels start to become stiff to turn, then back it off until they are free again (see illustration).
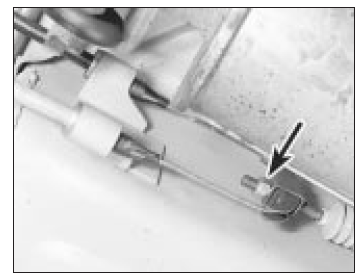
Handbrake cable adjusting nut
(arrowed) on yoke - rear drum brake
models
4. Check that the handbrake starts to take effect at the second notch of lever movement, and is fully applied by the fourth or fifth notch.
5. A further check may be made by removing the plug in the brake backplate (see illustration). When adjustment is correct, the pin on the handbrake operating lever is clear of the shoe web by approximately 3 mm with the handbrake released.
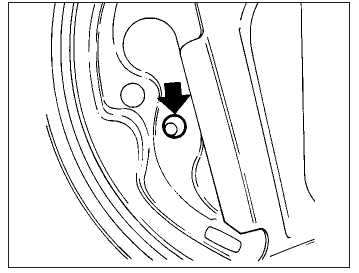
Check the handbrake lever pin
(arrowed) is correctly positioned as
described in text
6. When adjustment is correct, apply a smear of grease to the threads of the cable end fitting to prevent corrosion. Lower the vehicle, apply the handbrake and remove the wheel chocks.
Rear disc brake models
7. Before checking handbrake adjustment, drive for approximately 300 metres at low speed with the handbrake lightly applied. This will clean off any rust or glaze from the drums and shoes.
8. Chock the front wheels and engage a gear.
Slacken the rear wheel bolts. Raise and support the rear of the vehicle and remove the rear wheels.
9. Release the handbrake, then reapply it by two notches.
10. Slacken off the adjuster nut on the handbrake cable yoke (located to the left of the silencer) until it is at the end of its travel. If a silencer heat shield is fitted, access will be improved by removing it.
11. Turn a brake disc to bring the adjuster hole (the large unthreaded hole) into line with the adjuster at the bottom of the brake shoes.
Using a screwdriver through the hole, turn the adjuster wheel until the shoes are against the disc, then back it off again until the disc is just free to turn without the shoes dragging (see illustrations).
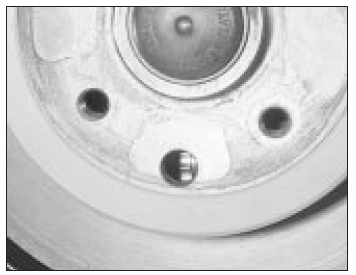
On models with rear disc brakes
the handbrake shoe adjuster wheel is
accessible through the hole in the disc . . .
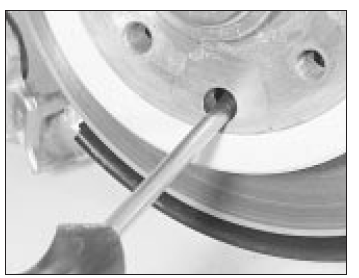
. . . and can be adjusted using a
suitable screwdriver
12. Repeat the operation on the other brake.
13. Tighten the cable adjuster nut until the shoes start to drag again. This should happen on both sides.
14. Release and fully reapply the handbrake a couple of times. Check that the discs turn freely when the control is fully released, and that the brake is fully applied at the sixth notch.
15. Refit the exhaust heat shield if it was removed. Refit the wheels, lower the vehicle and tighten the wheel bolts.
Hinge and lock lubrication
Lubricate the hinges of the bonnet, doors and tailgate with a light general-purpose oil.
Similarly, lubricate all latches, locks and lock strikers. At the same time, check the security and operation of all the locks, adjusting them if necessary.
Lightly lubricate the bonnet release mechanism and cable with a suitable grease.
Exhaust system check
1. With the engine cold (at least an hour after the vehicle has been driven), check the complete exhaust system from the engine to the end of the tailpipe. The exhaust system is most easily checked with the vehicle raised on a hoist, or suitably supported on axle stands. so that the exhaust components are readily visible and accessible.
2. Check the exhaust pipes and connections for evidence of leaks, severe corrosion and damage. Make sure that all brackets and mountings are in good condition, and that all relevant nuts and bolts are tight. Leakage at any of the joints or in other parts of the system will usually show up as a black sooty stain in the vicinity of the leak. Reputable exhaust repair systems can be used for effective repairs to exhaust pipes and silencer boxes, including ends and bends. Check for an MOT-approved permanent exhaust repair.
3. Rattles and other noises can often be traced to the exhaust system, especially the brackets and mountings. Try to move the pipes and silencers. If the components are able to come into contact with the body or suspension parts, secure the system with new mountings. Otherwise separate the joints (if possible) and twist the pipes as necessary to provide additional clearance.
Road test
Instruments and electrical equipment
1. Check the operation of all instruments and electrical equipment.
2. Make sure that all instruments read correctly, and switch on all electrical equipment in turn, to check that it functions properly.
Steering and suspension
3. Check for any abnormalities in the steering, suspension, handling or road "feel".
4. Drive the vehicle, and check that there are no unusual vibrations or noises.
5. Check that the steering feels positive, with no excessive "sloppiness", or roughness, and check for any suspension noises when cornering and driving over bumps.
Drivetrain
6. Check the performance of the engine, clutch (where applicable), gearbox/ transmission and driveshafts.
7. Listen for any unusual noises from the engine, clutch and gearbox/transmission.
8. Make sure that the engine runs smoothly when idling, and that there is no hesitation when accelerating.
9. Check that, where applicable, the clutch action is smooth and progressive, that the drive is taken up smoothly, and that the pedal travel is not excessive. Also listen for any noises when the clutch pedal is depressed.
10. On manual gearbox models, check that all gears can be engaged smoothly without noise, and that the gear lever action is not abnormally vague or "notchy".
11. On automatic transmission models, make sure that all gearchanges occur smoothly, without snatching, and without an increase in engine speed between changes. Check that all the gear positions can be selected with the vehicle at rest. If any problems are found, they should be referred to a Vauxhall/Opel dealer.
12. Listen for a metallic clicking sound from the front of the vehicle, as the vehicle is driven slowly in a circle with the steering on full-lock.
Carry out this check in both directions. If a clicking noise is heard, this indicates wear in a driveshaft joint, in which case renew the joint if necessary.
Check the operation and performance of the braking system
13. Make sure that the vehicle does not pull to one side when braking, and that the wheels do not lock prematurely when braking hard.
14. Check that there is no vibration through the steering when braking.
15. Check that the handbrake operates correctly without excessive movement of the lever, and that it holds the vehicle stationary on a slope.
16. Test the operation of the brake servo unit as follows. With the engine off, depress the footbrake four or five times to exhaust the vacuum. Hold the brake pedal depressed, then start the engine. As the engine starts, there should be a noticeable "give" in the brake pedal as vacuum builds up. Allow the engine to run for at least two minutes, and then switch it off. If the brake pedal is depressed now, it should be possible to detect a hiss from the servo as the pedal is depressed. After about four or five applications, no further hissing should be heard, and the pedal should feel considerably harder.
 Idle speed and mixture
adjustments
Idle speed and mixture
adjustments
1. Before checking the idle speed and mixture
setting, always check first the following.
Check that the ignition timing is accurate.
Check that the spark plugs are in good condition and correct ...

See also:
Opel Corsa Owners Manual. Engine data, Performance
Engine data
Engine data
1) Possible only if high engine load, full load or driving in mountainous
terrain with a caravan/trailer or high payload is
avoided.
2) Value not avail ...
