Opel Corsa B 1993–2000 Service and Repair Manual: Leaf spring rear suspension components (Astramax) - removal and refitting
Rear shock absorber
1. Raise and support the rear of the vehicle (see illustration).
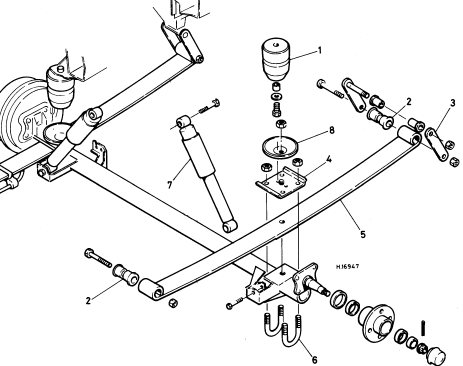
Exploded view of Astramax rear
suspension
- Bump stop
- Bushes
- Shackle
- Tensioning pin
- Leaf spring
- U-bolt
- Shock absorber
- Bump stop cup
2. Unload the shock absorber mounting by jacking up under the axle arm.
3. Slacken and remove the upper and lower mounting bolts and remove the shock absorber from the vehicle.
4. Refitting is the reverse of removal, tightening the shock absorber bolts to the specified torque.
5. Repeat the operations on the other side of the vehicle, then lower it to the ground.
Rear leaf spring
6. Raise the rear of the vehicle and support it securely. Support the rear axle with another jack.
7. Remove the handbrake cable bracket from the spring.
8. Disconnect the brake pressure regulating valve spring from the leaf spring.
9. Unbolt the front leaf spring-to-body attachment and remove the bolt.
10. Unbolt the rear spring-to-shackle attachment and remove the bolt.
11. Remove the bump stop nut and washer, and the cup itself.
12. Unscrew the U-bolt nuts. Remove the tensioning plate and the U-bolts.
13. Remove the leaf spring from the vehicle.
14. If the spring is being renewed, transfer the brake pressure regulating valve spring bracket to the new spring.
15.To renew the spring bushes, press or drive out the old bushes and press in the new ones using a long bolt, some tubing and washers. Coat the new bushes with liquid detergent as an assembly lubricant.
16.Refitting is the reverse of the removal procedure, noting the following points:
- The shorter section of the spring faces the front of the vehicle.
- The hole in the tensioning plate for the bump stop cup locating lug must be towards the centre of the vehicle.
- The exposed lengths of thread on the U-bolts must not differ by more than 3 mm.
- Adjust the position of the brake pressure regulating valve spring bracket so that the spring is neither tight nor slack.
Bump stop
17. Raise and support the rear of the vehicle .
18. Unscrew the bump stop bolt and remove the bump stop.
19. Refitting is the reverse of the removal procedure.
Rear axle
20. Slacken the rear wheel bolts, raise and support the rear of the vehicle and remove the rear wheels.
21. Remove the brake drums/discs and disconnect the handbrake cable.
22. Disconnect the brake flexible hoses at the bracket on the axle. Plug or cap the open unions.
23. Support the centre of the rear axle with a jack and a block of wood or a cradle.
24. Remove the shock absorber lower mounting bolts on both sides.
25. Remove the bump stop cups from both sides. They are each secured by a single nut and washer.
26. Unscrew the U-bolt nuts on one side of the axle. Remove the tensioning plate and the U-bolts.
27. Repeat the procedure on the other side.
Note: The axle may tip to one side or the other if it is not centrally supported.
28. Lower the jack and remove the axle from the vehicle.
29. Strip off the hubs, brake components etc if needed for transfer to another axle.
30. Refitting is the reverse of the removal procedure, noting the following points:
- The hole in the tensioning plate for the bump stop cup locating lug must be towards the centre of the vehicle.
- The exposed lengths of thread on the U-bolts must not differ by more than 3 mm.
- Tighten all fastenings to the specified torque.
- Bleed the brake hydraulic system and adjust the handbrake on completion.
Level control system - description and maintenance
1. On vehicles equipped with this system ride height can be controlled by pressurising the rear shock absorbers with air. The shock absorbers are connected to each other, and to the filling valve, by a high pressure pipeline.
The filling valve is similar to a tyre inflation valve; it is located on the right-hand side of the load area.
2. For normal (unladen) running, the system should be pressurised to 0.8 bar. Before loading the vehicle, measure the ride height between the rear bumper and the ground.
After loading, restore the ride height by increasing the system pressure using tyre inflation equipment. Do not exceed 5 bar.
3. Do not drive the vehicle unladen with a high pressure in the system, nor inflate the system to the maximum pressure before loading.
4. Maintenance consists of checking the pressure lines and unions for security and good condition.
 Rear axle mounting bushes
- renewal
Rear axle mounting bushes
- renewal
1. The mounting bushes must always be
renewed in pairs. Without doubt the
opportunity should be taken to renew them if
the axle is removed for some other reason.
They can be renewed with the axl ...
 Steering wheel - removal and
refitting
Steering wheel - removal and
refitting
Removal
1. Disconnect the battery earth lead.
2. Prise off the central cap from the steering
wheel. Disconnect the horn contact wires and
remove the cap (see illustration).
Removing the steer ...
See also:
Opel Corsa Owners Manual. Introduction
Introduction
Vehicle specific data
Please enter your vehicle's data on the previous page to keep it easily accessible. This information is available under the sections "Servi ...
