Opel Corsa B 1993–2000 Service and Repair Manual: Cylinder head - removal and refitting
Removal
Note: The procedure given here is for carburettor models. The procedure for fuel injection models is similar.
1. The cylinder head may only be removed when the engine is cold, otherwise there is a risk of distortion.
2. Disconnect the battery earth lead.
3. Remove the air cleaner.
4. Drain the cooling system.
5. Disconnect the radiator and heater hoses from the cylinder head and inlet manifold.
6. Disconnect and plug the fuel lines and unbolt the fuel pump. Also disconnect the fuel return line from the T-piece or carburettor. Be prepared for fuel spillage.
7. Unbolt and remove the camshaft cover, noting the location of the clips which secure the HT leads and fuel lines. Also disconnect the breather hose (when fitted). Recover the gasket.
8. Disconnect the control cables and electrical cables (as applicable) from the carburettor.
9. Release the coolant pipe bracket at the inlet manifold.
10. Disconnect the brake servo vacuum hose from the inlet manifold.
11. Slacken the alternator pivot bolt, remove the adjusting strap bolt at the engine end and remove the alternator drivebelt.
12. Align the timing marks, slacken the camshaft toothed belt and remove it from the camshaft sprocket.
Unless it is wished to remove the belt entirely, there is no need to remove the crankshaft pulley.
13. Disconnect the HT leads, identifying them if necessary. Remove the distributor cap and the distributor itself.
14. Disconnect the temperature gauge wire from the sender on the thermostat housing or inlet manifold.
15. Unbolt the exhaust downpipe(s) from the exhaust manifold.
16. Following the reverse sequence to that shown in illustration, slacken each cylinder head bolt by a quarter turn. Following the same order, slacken each bolt by a half turn, then remove them completely. The bolts should by discarded, and new ones used for refitting.
17. Lift off the camshaft housing and camshaft, disconnecting any breather hoses which are connected to the housing.
18. Lift off the cylinder head using the manifolds as handles if it is stuck. Do not prise between the head and block or damage may result.
19. Remove the rocker arms and thrust pads from the cylinder head. Withdraw the hydraulic valve lifters and immerse them in a container of clean engine oil to avoid any possibility of them draining. Keep all components in their original order if they are to be refitted (see illustration).
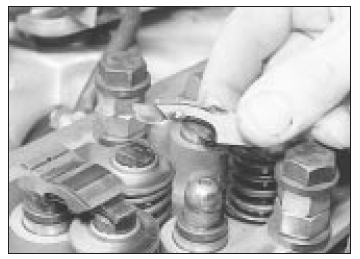
Removing a rocker arm
20. If the cylinder head has been removed for decarbonising or for attention to the valves, hydraulic valve lifters and springs.
Refitting
21. Before refitting the cylinder head, ensure that the block and head mating faces are spotlessly clean and dry with all traces of old gasket removed. Use a scraper to do this, but take care to cover the water passages and other openings with masking tape or rag to prevent dirt and carbon falling in. Remove all traces of oil and water from the bolt holes otherwise hydraulic pressure created by the bolts being screwed in could crack the block or give inaccurate torque settings. Ensure that the bolt threads are clean and dry.
22. When all is clean locate a new gasket on the block so that the worn OBEN or TOP can be read from above (see illustration). Do not use any jointing compound on the gasket.
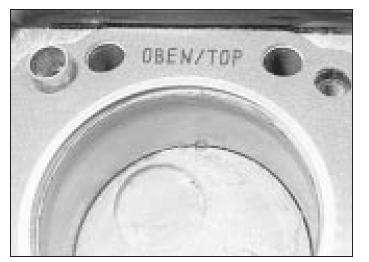
Head gasket must be fitted with the
word OBEN (or TOP) uppermost
23. Refit the hydraulic valve lifters, thrust pads and rocker arms to the cylinder head in their original positions. If new hydraulic valve lifters are being used, or if they were dismantled for cleaning, immerse each one in a container of clean engine oil and compress it (by hand) several times to charge it.
24. Locate the cylinder head on the block so that the positioning dowels engage in their holes.
25. Apply a uniform bead of jointing compound to the mating face of the cylinder head and lower the camshaft housing into place. Position the sprocket with the timing marks aligned.
26. Fit the new cylinder head bolts and tighten them in the order shown, in the stages given in the Specifications. The required angular measurement can be marked on a card and then placed over the bolt as a guide to the movement of the bolt (see illustrations).
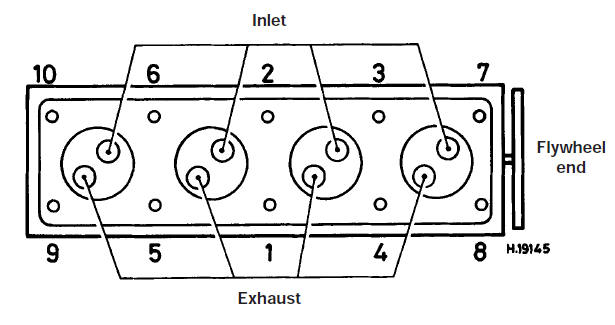
Cylinder head bolt tightening sequence
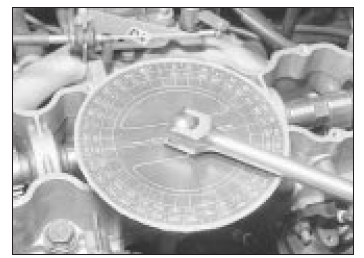
Using a marked card to measure
angular rotation when tightening cylinder
head bolts
27. Refit the distributor.
28. Refit and secure the exhaust downpipe(s).
Apply a little anti-seize compound to the bolts.
29. Refit the camshaft cover, using a new gasket. Tighten the bolts in diagonal sequence, remembering to fit the HT lead and fuel line brackets (see illustrations).
Fitting a new camshaft cover gasket
HT lead bracket is secured by one
of the camshaft cover bolts
30. Reconnect the HT leads and refit the distributor cap.
31. Refit the fuel pump, using new gaskets on each side of the spacer. Reconnect the fuel supply and return lines.
32. Refit and tension the camshaft toothed belt, then refit the belt cover.
33. Refit and tension the alternator drivebelt.
34. Refit the coolant hoses and refill the cooling system.
Secure the coolant pipe bracket to the inlet manifold.
35. Reconnect the throttle and choke cables to the carburettor. On models with automatic choke, reconnect the electrical lead to the choke.
36. Refit the brake servo vacuum hose, the temperature gauge wire and the crankcase breather hose(s).
37. Check that nothing has been overlooked, then refit the air cleaner.
38. Reconnect the battery and start the engine. There may be considerable valve gear noise until the hydraulic tappets pressurise with oil.
39. Run the engine until it reaches normal operating temperature, then check the ignition timing.
40. Switch off the engine, immediately remove the air cleaner and tighten the cylinder head bolts through the final specified angle, following the outward spiral pattern previously used. No further tightening is necessary.
 Camshaft toothed belt -
removal, refitting and adjustment
Camshaft toothed belt -
removal, refitting and adjustment
Note: The following procedure will necessitate
re-positioning of the water pump which, in
turn, is likely to cause leakage from around the
sealing flange. Minor leakage can normally be
rectified b ...
 Camshaft - removal and
refitting
Camshaft - removal and
refitting
Removal
1. The camshaft can only be removed without
disturbing the housing if special tool 603 850,
or equivalent, is available to depress the cam
followers whilst the camshaft is withdrawn.
2. A ...
See also:
Opel Corsa B 1993–2000 Service and Repair Manual. Rear axle assembly - removal
and refitting
Removal
1. Slacken the rear wheel bolts, raise and
support the rear of the vehicle and remove the rear
wheels.
2. On vehicles with a level control system,
depressurise it at the filling valve.
3 ...
